Preserve Reishi mushrooms to lock in those elusive medicinal compounds for future teas and tinctures. Drying prevents molding. Our tested protocol focuses on moisture removal at low temperatures to protect heat-sensitive triterpenes. Use a food dehydrator set to 110 degrees Fahrenheit. This method ensures the mushrooms reach a brittle state without degrading the ganoderic acids that make this fungus so valuable in the first place. If a dehydrator is not available, we have developed alternative workflows for oven drying and air drying. These methods allow storage for over a year.
Key Takeaways
- 1Slice reishi into strips no thicker than 1 cm before drying - uneven slices cause case hardening and mold inside storage jars
- 2Set your dehydrator to 110 degrees Fahrenheit - above 140 degrees, total phenolic content drops by around 15 percent
- 3Use the snap test to confirm dryness - a properly dried slice breaks cleanly rather than bending
- 4Properly dried reishi stored in glass jars with silica desiccant stays potent for 18 to 24 months
What you need
Preparation is everything. You cannot simply throw a whole Reishi mushroom into a dehydrator and expect it to turn out well. The dense, woody structure of the Ganoderma genus requires careful handling to ensure even moisture loss.
Use a sharp chef knife or a stainless steel meat slicer to process the mushrooms. Reishi is tough. It contains high levels of chitin. Chitin is that same hard material found in the shells of crustaceans. A dull blade will just slip on the waxy cap surface. Use a soft-bristled brush to remove forest debris. Avoid soaking the mushrooms in water because they act like sponges. Excessive water intake increases the drying time and raises the risk of internal rot.
Our protocol requires a high-quality food dehydrator with adjustable temperature controls. We prefer models with rear-mounted fans for horizontal airflow. This design prevents flavor contamination between trays. If an oven is the only option, use a wire cooling rack and a wooden spoon to prop the door open. You should also have airtight glass jars and silica desiccant packs ready for long-term storage. These items help maintain a moisture content below 10 percent.
Step-by-step drying guide
We follow a strict sequence to ensure the mushrooms retain their therapeutic value. This process begins the moment we bring the fresh mushrooms into our workspace.
Step 1. Clean and inspect
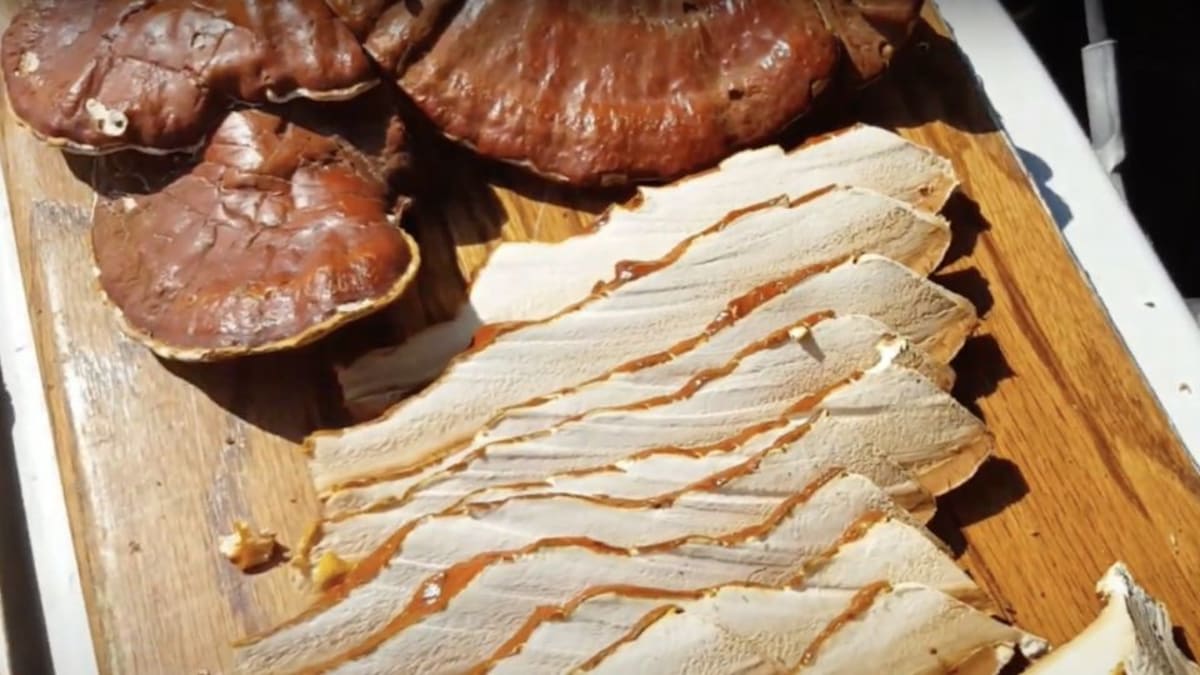
Examine every mushroom for signs of mold or insect damage. Look for small holes in the underside of the white pore surface. These holes often indicate the presence of fungus gnats. Discard any specimens that feel soft or smell like ammonia. Use a damp cloth to wipe the mahogany-colored caps. Do not submerge them. A 2024 study in the Journal of Fungi found that excessive washing can leach out water-soluble polysaccharides before the drying even begins. Focus on the base where the mushroom grew from the wood. This area often holds dirt or bits of bark.
Step 2. Slice for surface area
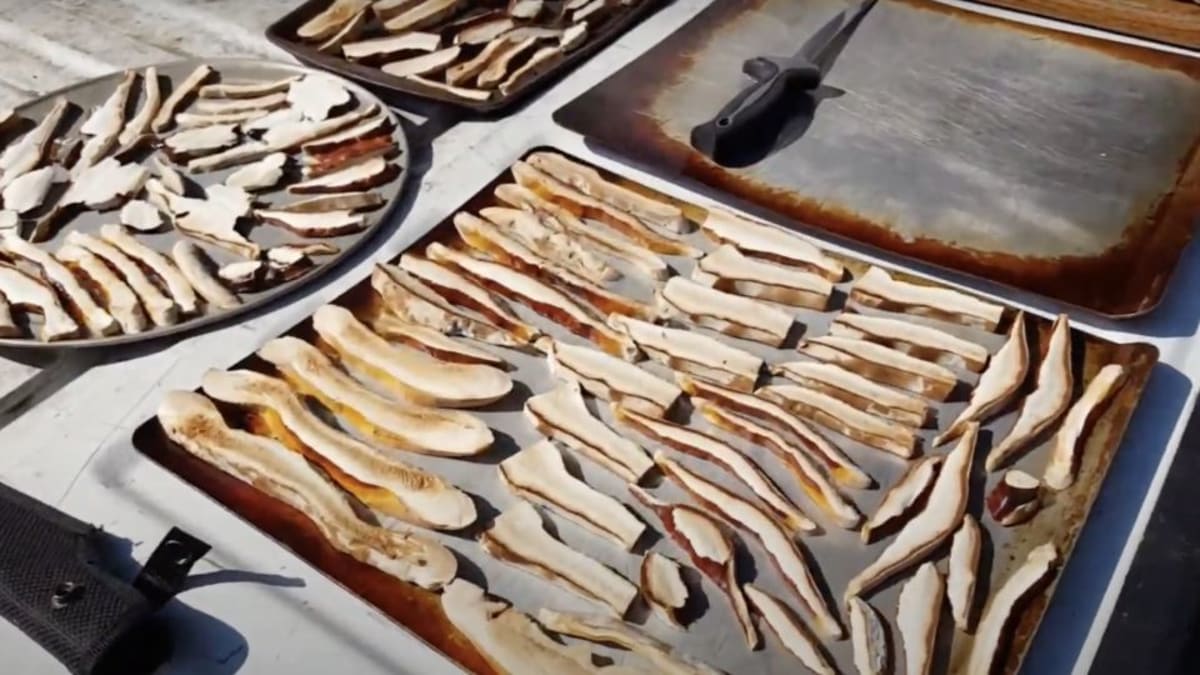
Cut the Reishi into thin strips. These strips should be no more than one centimeter thick. Thinner slices dry faster and more uniformly. When the slices are too thick, the outside hardens while the inside remains damp. We call this case hardening. It leads to mold growth inside storage jars weeks later. Use a meat slicer for large batches to ensure every piece is uniform. Lay the slices out on a clean work surface. Ensure they do not overlap.
Step 3. Select your drying method
We have tested four different ways to remove moisture from Reishi. We use the dehydrator for its precision.
The Dehydrator Method
Arrange the slices on the trays. Leave a half-inch gap between each piece. Set the temperature to 110 degrees Fahrenheit. This is approximately 43 degrees Celsius. A 2023 report in Frontiers in Nutrition found that temperatures above 140 degrees Fahrenheit reduce total phenolic content by 15 percent. Let the machine run for six to eight hours. Check the mushrooms every two hours. Rotate the trays if the model has a bottom-mounted fan.
The Oven Method
Use this method when a dehydrator is unavailable. Set the oven to its lowest possible setting. This is usually 150 degrees Fahrenheit. Place the mushroom slices on a wire rack over a baking sheet. The rack allows air to reach the bottom of the slices. Prop the oven door open by two inches. Use a wooden spoon to hold it. This gap allows the humid air to escape the oven chamber. Monitor the mushrooms closely. They can burn quickly at these temperatures. Flip the slices every hour. This method usually takes four to six hours.
The Air Drying Method
Use this method only in environments with humidity below 40 percent. String the slices together using a needle and cotton thread. Hang them in a spot with high airflow. Avoid direct sunlight. UV rays can degrade some of the active metabolites in the mushroom skin. This process takes five to ten days. Touch the mushrooms daily. Look for a "leathery" feel that transitions into a "stony" feel...
The Freeze Drying Method
Reserve this for professional batches. It involves freezing the mushrooms to minus 40 degrees. Then use a vacuum pump to remove moisture through sublimation. This preserves the exact shape and color of the fresh mushroom. It is the most expensive option. It retains the most heat-sensitive compounds.
Step 4. The snap test
Take a cooled slice and attempt to bend it to verify the mushrooms are completely dry. It should not flex. It should snap cleanly into two pieces. If it feels like leather, it still holds water. Return those pieces to the heat for another hour. Wait for the mushrooms to reach room temperature before moving them to containers. Condensation will form if you put warm mushrooms into a sealed jar.
Step 5. Final storage
Place the brittle slices into glass Mason jars. Add one food-grade silica packet to each jar. Store the jars in a dark pantry. Keep the temperature between 60 and 70 degrees Fahrenheit. Label every jar with the harvest date and the drying method used. Properly dried Reishi remains active for 18 to 24 months.
Common mistakes to avoid
We often see beginners make the same errors during their first drying session. These mistakes can ruin a harvest or result in weak tea.
We see many people try to dry whole Reishi caps. This is a mistake. The dense flesh of a whole cap can take weeks to dry in the center. By the time the middle is dry, the outside has likely begun to decay. We always slice the mushrooms. We also see people use high heat to speed up the process. They treat the mushroom like beef jerky. High heat cooks the proteins. It changes the chemical profile of the mushroom. We stick to low temperatures.
We also notice that some foragers ignore the white edge rule. Fresh, growing Reishi has a bright white or yellow edge. This is the most active part of the mushroom. If the entire mushroom is dark red and dusty with spores, it is past its prime. It will be more difficult to dry. It may have already started to break down. We prefer to harvest when the white growth margin is still visible.
Avoid using plastic bags for storage. Even airtight plastic is slightly permeable to oxygen over long periods. Use glass. It is non-reactive and provides a better barrier against moisture. Avoid storing jars on the counter. Light is an enemy of mushroom chemistry.
Next Steps
Once your dried reishi is ready, the real work begins. Many people move directly into brewing reishi mushroom tea for daily consumption, which takes just 20 to 30 minutes. Others prefer the potency of a reishi tincture, which involves a dual-extraction process using both alcohol and hot water. Both methods extract the full spectrum of ganoderic acids and polysaccharides that make properly dried Reishi so valuable.
Frequently Asked Questions

A dedicated wellness researcher who spent decades cataloging the impact of forest-based nutrition on human aging. Ashley doesn't care about trends; she cares about the data.
References & Further Reading
- Frontiers in Nutrition 2023 — Frontiers in Nutrition (2023)
- Journal of Fungi 2024 — Journal of Fungi (2024)
- Food Chemistry 2025 — Food Chemistry (2025)